
ONE BASIN OR TWO?
If you've always had two basins, you might not realize the advantages of having a single basin. And, if you've only had a single basin sink, you might think you're missing out on an added feature. In my opinion, single basin sinks are the "less is more" option because:
- With two basins, you have to choose which side to put the garbage disposal on. Most people choose the smaller side, envisioning themselves peeling carrots blissfully right into the garbage disposal. But, what about when you have to soak the burnt stuff off the bottom of a big pot? You'll end up dumping the water in the deep side (because the other basin is too small to empty out the contents of your large pot as fast it will pour out). Then, you'll end up scooping out the gunk with your fingers to move it from the larger basin's drain to the disposal - YUCK.
- The drain placement on double basin sinks places the garbage disposal where takes up more of your storage room cabinet below the sink
- The divider between the two basins makes it difficult to hand wash large trays. Even if the center divider is designed to be lower to help with this issue, there is a lot of maneuvering around required to wash & rinse baking pans - which inevitably causes you to spill water onto the counter and your waist. And, isn't it better when the whole baking tray can fit in the sink so that you can still use the sink to wash your hands, if needed... rather than balancing the tray on the center divider while it soaks?
- Almost no one washes dishes at home like they used to before dishwashers were common. Two basins used to make sense because you would fill up one side with soapy water to wash and the other side with clean water to rinse before stacking the wet dishes in a dish drying rack on the counter (or handing them off to a helper, if you were lucky enough to have one).
- During meal prep, your kitchen sink is usually doing 3 jobs: washing hands, rinsing produce, and holding on to dirty dishes that there is no room for in the dishwasher (the last job being our own fault for getting in our own way of a pleasant cooking experience). After your meal, the sink is used to soak dishes that need extra attention before they go into the dishwasher, or for washing hand washables.
FIRECLAY vs. CAST IRON
Both are great options, and I have not had any clients who regretted either choice. I tend to suggest one over the other more for appearance and price point rather than maintenance concerns.
OUR FAVORITE FIRECLAY FARMHOUSE SINK
Our favorite fireclay sink is the Shaws Original Lancaster Single Bowl Apron Front RC3018. The 30"x18"x10" size (26-3/4"x15-1/4"x8-1/2" inside) is perfect for baking trays. The blue 'Shaws' badge on the back of the sink dates back to its origins in 1897, making it perfect for vintage-vibe kitchens. An offset drain leaves room for a pull-out below the sink for garbage and recycling bins.
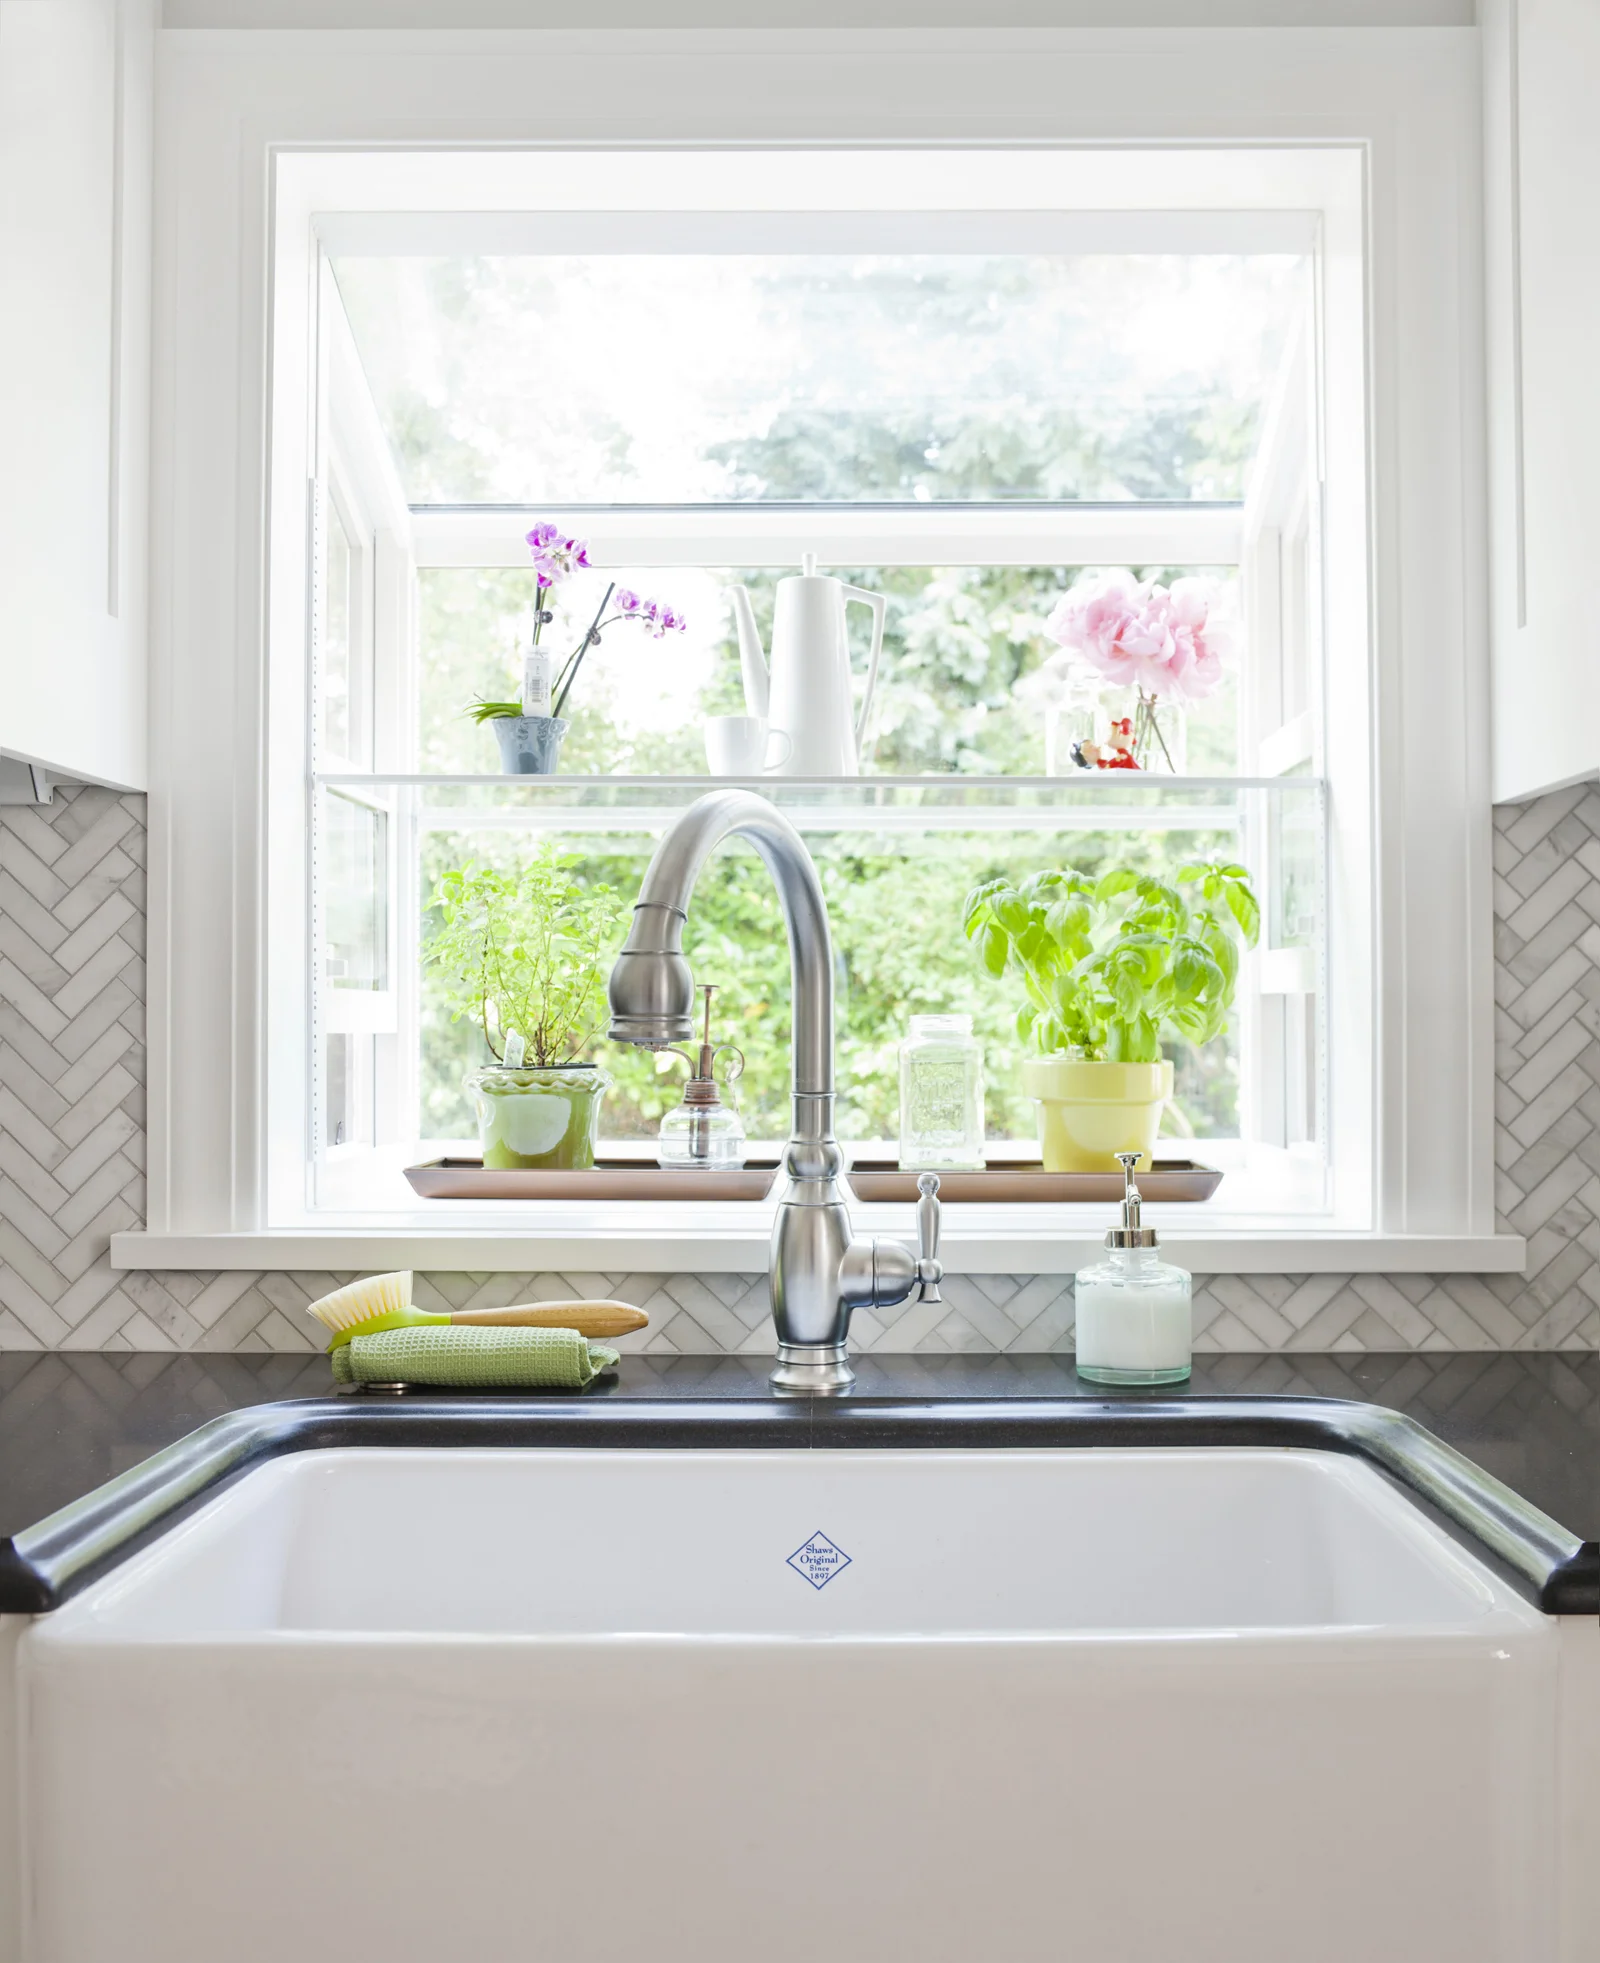
Shaws Original Lancaster Single Bowl Apron Front Fireclay Kitchen Sink - photo ©Cindy Apple
There are some planning and installation challenges unique to this type of sink that you need to be aware of, and not all project timelines or cabinetmakers/installers are up to these challenges:
- Due to this being a fired clay product, the dimensions will vary plus or minus 2% from sink-to-sink. You will need to inspect your sink upon delivery for squareness of the sides and top within the 2% tolerance and also test the sink for proper drainage. Shimming of the sink might be necessary for proper drainage. (Note: I have never had one of these sinks arrive that weren't a-okay, but you should inspect the sink well before installation so that you have time to exchange it in the unlikely event of any defects.)
- The cabinet needs to be designed to hold a 190 lb. sink and water. This is typically done with a 3/4" plywood deck support.
- The sink can be mounted a number of ways, most commonly it is undermounted below the countertop surface. It can also be mounted so that it is above the countertop, creating a vertical lip.
- The cabinet face will have to be scribed to the sink shape. Your cabinetmaker/installer will need the actual sink in order to do this. YOU NEED A VERY SKILLED INSTALLER TO DO THIS WELL SO THAT THE JOINT IS AS CLEAN AS POSSIBLE. If you have conversion varnish finish on your cabinets (which is most common these days), any touch-up will need to be done by a skilled professional.
- You will need to order a sink flange extension for the garbage disposal, due to the thickness of the sink.
- The positioning of the sink from front to back needs to be planned to accommodate the installation of faucets & accessories.
- If you are undermounting the sink, the amount that the countertop laps onto the top rim of the sink will need to be specified so that you get the result you intended.
- You will need to specify a right or the left side drain, otherwise you will get a random choice (they manufacture more left-side drains than right-side drains, so you are more likely to get a lefty).
FIRECLAY CARE & MAINTENANCE
- To avoid water spotting, the manufacturer suggests that you wipe down the sink bottom after use. Waxing the sink will encourage drainage.
- If a metal pot or pan leaves a mark on the surface, ROHL recommends Astonish Cleaner available from your local ROHL dealer to remove it.
- Fireclay is resistant to chips, scratches, and stains. However, if you do get a chip, you many purchase a color-matched repair kit from your local ROHL dealer.
- ROHL offers a 10-year warranty on fading/staining.
OUR FAVORITE CAST IRON FARMHOUSE SINK
Our favorite cast iron sink is the Kohler Whitehaven Self-Trimming under-mount single-bowl kitchen sink with short apron K-5826. This one is less expensive (approx. $950 retail) than the Shaws sink approx. $1,400 retail) and tends to be easier to source from local plumbing retailers with faster turnaround. It also has an offset drain. This one is always in the rear right-hand corner, so you will have room for a pull-out below the sink for garbage and recycling bins. A left hand drain option is not available.

The Whitehaven has some installation advantages, including:
- There is a notch in the sink behind the apron that allows the cabinet face to slide behind it. So, you don't have to cut the cabinet face in the exact shape of the sink, and you will get a clean cosmetic result with less risk during installation.
- You do not need a sink flange extension for the garbage disposal (the sink body is not as thick as the Shaws sink body).
Some differences to note:
- Due to the notch behind the apron, the position of the sink from front-to-back on the countertop is fixed for this sink. It is also larger in the front-to-back dimension than the Shaws sink, so you will need to make your sink base cabinet deeper if you need more room for faucets behind the sink.
- There are two apron heights available. The inside of the sink is the same size for both. We prefer this version, the shorter apron, because it looks nice with the typical height of top drawers and allows for larger doors under the sink (which means the garbage/recycling bins can fit).
- The inside dimensions of the bowl are slightly larger at 27-3/4"x18-1/16"x9".
- Overall dimensions are 32-1/2" (apron front) x21-9/16"x9-5/8" (deepest part of the bowl).
Similarities include:
- This is also a heavy sink that requires support, such as a 3/4" deck.
CAST IRON CARE & MAINTENANCE
- You should not use abrasive cleaners to clean the porcelain enamel finish.
- If the porcelain enamel chips through to the iron, the dark cast iron color will show and exposed iron can rust. However, Kohler provides a warranty against chips, cracks, or burns for as long as the original purchaser owns his/her home.
- Gloss reduction, scratching, staining, and alkaline etching of the finish over time due to use, cleaning products, water, or atmospheric conditions are considered normal wear & tear and not covered under warranty.